This is part 5 of a series of posts about getting BIM data into Unity.In our previous posts we looked at how to get information from our BIM Model into a Schedule: a text file with data about the elements. This post will do something with this schedule.Parsing a Schedule in UnityRegardless if you start from an ArchiCAD or Revit model, you should end with the geometry inside Unity from the FBX conversion (see previous posts) and a text-file containing a subset of information you want to transfer to the model, so it can be accessed from within the realtime model.Ensure you save (or copy) the schedules somewhere in the Unity Assets folder. The name does not really matter, as we’ll ensure that we can set it in our script as a variable.Reading the text from a Schedule file (“parsing”) requires creating a new C# script. While this is not a Unity scripting tutorial, we’ll show you what we did. Maybe you can improve on it or spot some errors.We need three scripts: one for the data, to be attached to our GameObject, one to do the parsing (reading the file and adding the date to the GameObject data-component and one script which reacts when we click on an element in the Unity view.Script 1 - Metadata“Metadata” is a very simple class with only two variables: one array of strings holding the names of available properties, called “keys” and one array of strings with the values for all properties, called “values”. We could use more sophisticated classes and container objects, but this is simple to use and makes the results directly visible in the Unity Editor, which helps a lot during development.Code Excerptusing UnityEngine;
using System.Collections;
public class metadata : MonoBehaviour {
public string[] keys;
public string[] values;
}
See what we did? Actually not much and not very robust either. An array of strings for the keys, containing the names of the parameters and an array of values with (you guessed it right) the values of the parameters.You could attach this script as a component to any game object and Unity will provide a very basic interface automatically in the editor.

You could do this for testing, as it allows you to manually prepare some values and see how to get to them at runtime. Just increase the Size of the Arrays in the Inspector and write some strings in the fields that appear.

However, we want to be a bit (a lot?) smarter and do this automatically.
Script 2 - Parser
The “ScheduleParser” class will do the heavy working. We can attach it to any object. When the game starts, we do the slow work of reading the file, extracting its content and attaching it to our objects, so the data becomes available at run-time. This might take some time, but needs to be performed only once, so use the Start() method.
Let’s write an outline first, so we attack this in a structured way:
First, we read the schedule CSV as a series of strings
for each line split it into values (using space/tab/semicolon). The first field will give us the entity ID
Traverse the scene and compare the name of the object with the ID.
If found, add the data to the entity, using a custom component with two list of strings: keys and values.
We start very simple, with a new script (which only needs the Start method - remove the Update method) and some variables, which are used to define the file to read, split into Path, Name and Extension. These values will be combined into the full fileToParse string (which is set private, as we don’t need to expose it in the editor).
using UnityEngine;
using System.Collections;
public class scheduleParser : MonoBehaviour {
// the internal file name (private)
private string fileToParse = "";
// some public variables, to configure this script
public string filePath = "filePath";
public string fileName = "fileName";
public string fileExtension = "txt";
// Use this for initialisation
void Start () {
}
}
Then we’ll compile the full File Name, requesting the dataPath from our application, which gives us the main Asset Folder of the Unity Project. We use “Path.Combine” to concatenate the strings “filePath” and “FileName”, which ensures that it uses the right Path Separator on the current platform (“\” or “/” or something else). The extension can be added with a dot.
Then it is possible to define a FileInfo class and a TextReader, which make it easy to work with the file. We ensure that we do have a “theSourceFile” and that it exists.
The TextReader class will allow us to open the file as Text and place it into the Reader.
A Debug.Log line will write some feedback into the console.
// Use this for initialisation
void Start () {
fileToParse = filePath;
fileToParse = Path.Combine(fileToParse, fileName);
fileToParse = fileToParse + "." + fileExtension;
FileInfo theSourceFile = null;
TextReader reader = null; // NOTE: TextReader, superclass of StreamReader and StringReader
// Read from plain text file if it exists
theSourceFile = new FileInfo (Path.Combine(Application.dataPath,fileToParse));
if ( theSourceFile != null && theSourceFile.Exists ){
reader = theSourceFile.OpenText(); // returns StreamReader
Debug.Log("Created Stream Reader for " + fileToParse + " (in Datapath)"
);void Start () {
fileToParse = filePath;
fileToParse = Path.Combine(fileToParse, fileName);
fileToParse = fileToParse + "." + fileExtension;
FileInfo theSourceFile = null;
TextReader reader = null; // NOTE: TextReader, superclass of StreamReader and StringReader
// Read from plain text file if it exists
theSourceFile = new FileInfo (Path.Combine(Application.dataPath,fileToParse));
if ( theSourceFile != null && theSourceFile.Exists ){
reader = theSourceFile.OpenText(); // returns StreamReader
Debug.Log("Created Stream Reader for " + fileToParse + " (in Datapath)"
}
}
Beware that to be able to use FileInfo and TextReader (which are currently displayed in Red), we need to add a few “using” statements at the beginning or our script:
using UnityEngine;
using System.Collections;
using System.IO;
Now these classes appear in their regular color in the script.
using System.Collections;
using System.IO;
Now these classes appear in their regular color in the script.
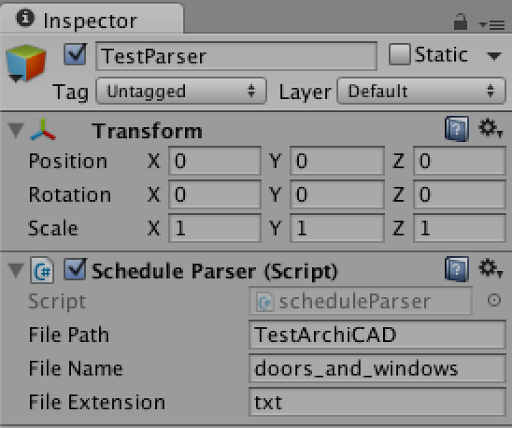
Attach this script to a new, empty GameObject and configure the variables. We set the Path to the folder in which our exported ArchiCAD schedule is stored and set the file name and file extension accordingly.
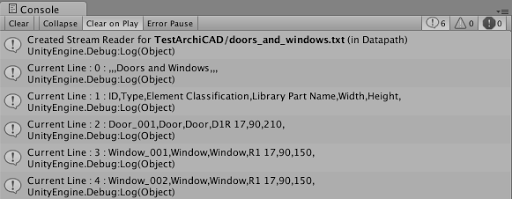
Pressing play now will reveal in the Console that the file was read correctly.

Now we will go through the content of the file and read each line individually. We want to split the line into its constituting parts. The first (or second) line in the script will contain the Headers, which are the names of our parameters and the following lines contain the values. By having the first column contain the Identifier, we can relate this info back to the GameObject in our scene, if we search for it.
It is fairly straight forward: we use a while-loop, checkin a “goOn” bool variable continuously. In each step of the loop, we check if “reader.ReadLine()” actually returns a valid string (buf variable). If not, we return (= leave the loop).
For now, we simply copy the buf string on the console for testing.
void Start () {
[…]
if ( theSourceFile != null && theSourceFile.Exists ){
reader = theSourceFile.OpenText(); // returns StreamReader
Debug.Log("Created Stream Reader for " + fileToParse + "
(in Datapath)");[…]
if ( theSourceFile != null && theSourceFile.Exists ){
reader = theSourceFile.OpenText(); // returns StreamReader
Debug.Log("Created Stream Reader for " + fileToParse + "
}
if (reader == null) {
Debug.Log (fileName + " not found or not readable");
} else {
// Read each line from the file/resource
bool goOn = true;
int lineCounter = 0;
while (goOn) {
string buf = reader.ReadLine ();
if (buf == null) {
goOn = false;
return;
} else {
Debug.Log ("Current Line : " + lineCounter + " : " + buf);
}
lineCounter++;
}
}
}
}
}
}
Press play and check that all lines from the file are displayed in the console. Beware that the first line contains the title of the schedule, the second line the headers and the following lines the values. However, this is not always the case and may differ between ArchiCAD and Revit-exported schedules.
We’ll add two more public variables at the beginning of our script, so it can be controlled in the Unity Editor.
private string fileToParse = "";
public string filePath = "filePath";
public string fileName = "fileName";
public string fileExtension = "txt";
public int headersLineNumber = 0;
public int valuesFromLine = 1;
public string filePath = "filePath";
public string fileName = "fileName";
public string fileExtension = "txt";
public int headersLineNumber = 0;
public int valuesFromLine = 1;
The first variable (headersLineNumber) defines which line contains the header of the table, to derive the names of the variable. We add the “headers” variable, which is an array of strings. Do this outside of the while loop.
If our current lineCounter equals the header, we split the line into strings for the header array.
Beware, here we split with commas, but that depends on your files. It may be best to define this as a variable too.
if (reader == null) {
Debug.Log (fileName + " not found or not readable");
} else {
// Read each line from the file/resource
bool goOn = true;
int lineCounter = 0;
string[] headers;
while (goOn) {
string buf = reader.ReadLine ();
if (buf == null) {
goOn = false;
return;
} else {
Debug.Log ("Current Line : " + lineCounter + " : " + buf);
string[] values;
if (lineCounter == headersLineNumber) {
headers = buf.Split(',');
Debug.Log("--> Found header " + headers[0]);
}
if (lineCounter >= valuesFromLine) {
// now we get a , ; or-delimited string with data
// ID ...
values = buf.Split(',');
string ID = values[0];
Debug.Log("--> Found values " + values[0]);
}
if (lineCounter == headersLineNumber) {
headers = buf.Split(',');
Debug.Log("--> Found header " + headers[0]);
}
if (lineCounter >= valuesFromLine) {
// now we get a , ; or
string ID = values[0];
Debug.Log("--> Found values " + values[0]);
}
}
lineCounter++;
}
}
}
The first string in the values list is the ID-string. We need this later to get the actual GameObject corresponding to this ID.
This can be improved in a few ways, but let’s work with this for now.
The final step is to actually attach the Metadata class as a component to the GameObject which has the same ID as the value in the first string of the values-array. However, depending on the source you use, this may be in a different location. First, with the ArchiCAD to Cinema4D to Unity export, the GameObjects are named with their user-editable ID. The example below displays “Door_001” which is the ID. That is actually an empty GameObject, with the geometry underneath, as separate Polygon_X children.

However, with the Revit to FBX export, we get a different structure: here all Revit Elements are single objects, with the ID at the end of the name, between square brackets.
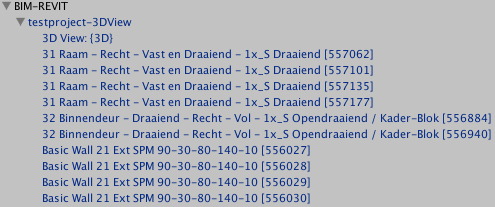
So we have to make the script more versatile, to cater for the different structures (and schedules). And we haven’t attempted AutoCAD, VectorWorks, Allplan or Microstation yet…
The first case, with objects having the full name, we can use the (slow) Find method. Being slow is OK here, as this will only run once in the Start() method and not every single frame (the Update() method).
Debug.Log("--> Found values " + values[0]);
// Find object with this name
GameObject go;
// Attempt 1 - Assume the ID equals the full name
// This works for the ArchiCAD file as the ID is used as Object Name
go = GameObject.Find(ID);
// Find object with this name
GameObject go;
// Attempt 1 - Assume the ID equals the full name
// This works for the ArchiCAD file as the ID is used as Object Name
go = GameObject.Find(ID);
If there is an Object anywhere in the scene which has its name identical to the ID we can find it. Beware that in case of multiple objects with the same name, only the first occurrence will be retrieved. That is the reason we needed to ensure that all IDs in ArchiCAD are unique. In Revit, they are by-definition unique (at least in a single project file).
The second method will traverse the structure of GameObjects, to check each GameObject name with the ID. This is a lot slower (or is it? Not sure of the Unity Find method does something similar… Probably more optimised, anyway).
// Attempt 2 - Assume the ID is part of the full name
// For the Revit schedule, the ID is part of the Object Name e.g. "Family Type [12345]"
if (go == null){
foreach (var gameObj in
FindObjectsOfType(typeof(GameObject)) as GameObject[]){
if(gameObj.name.Contains(ID.ToString())){
go = gameObj;
}
}
}
// For the Revit schedule, the ID is part of the Object Name e.g. "Family Type [12345]"
if (go == null){
foreach (var gameObj in
FindObjectsOfType(typeof(GameObject)) as GameObject[]){
if(gameObj.name.Contains(ID.ToString())){
go = gameObj;
}
}
}
Here we use the “Contains” method to look inside the object name for the ID. We might include the brackets here, but then it would only work for Revit. There is a chance of finding unrelated objects, if they contain the same string in their name (e.g. as part of a Family or Type). But I’ve already explained that this is not bullet-proof secured code.
And finally, when we were able to retrieve an object with this ID, we add the Metadata Component to it and copy the headers and values string-arrays to it.
if (go != null) {
Debug.Log (" Found ID : " + ID);
go.AddComponent<metadata>();
metadata meta = go.GetComponent<metadata>();
meta.values = values;
meta.keys = headers;
} else {
Debug.Log(" No objects found with ID: " + ID);
}
Debug.Log (" Found ID : " + ID);
go.AddComponent<metadata>();
metadata meta = go.GetComponent<metadata>();
meta.values = values;
meta.keys = headers;
} else {
Debug.Log(" No objects found with ID: " + ID);
}
We check that we indeed have a GameObject (go != null) and then add a “metadata” component to it.
With the GetComponent, we can retrieve it as an object so we can copy the values to it.
We do get an error when compiling. The “headers” variable is not assigned a value.
Assets/Scripts/scheduleParser.cs(90,69): error CS0165: Use of unassigned local variable `headers'
So when we first declare “headers”, we initiate it to a String Array with zero strings first.
string[] headers = new string[0];
Let’s see what this brings us here:
Let’s run the script. Depending on how you configured the model and the schedule, you can take a look in the Inspector after having pressed Play to check if there is a metadata component added and if the values were filled in. Here I selected the Door_001 GameObject and noticed the Keys and Values arrays that have been filled in.
Hurray! Success.

To load multiple lists, you can attach the ScheduleParser script multiple times to the GameObject.

And now the Revit objects get some attention as well…
Or do they? Alas, nothing it returned. Looking in detail, we find that the Revit Strings are surrounded by quotes and so our (naive) string contain method does not return 12345 equal to “12345”
We could test the first character and remove possible quotes when they occur. But I can imagine several scenarios where we may end up with problems anyway (and lets not talk UTF8 or double-quoted quotes for a moment.
Time to migrate to a more robust method (or leave out the quotes, but then we may face other problems, such as strings containing “,” which will act as delimiters.
Luckily, somebody else did the hard work for use and wrote a nice CSV splitter, using Regular Expressions. This takes multiple type of delimiters into account and does get rid of the quotes if they occur.
Here is a nice SplitCSVLine method we can borrow:
It does require to more “using” statements at the top of the file:
using System.Linq;
using System.Text.RegularExpressions;
and then we can copy the whole function in our class:
using System.Text.RegularExpressions;
and then we can copy the whole function in our class:
// splits a CSV row
// http://answers.unity3d.com/questions/144200/are-there-any-csv-reader-for-unity3d-without-needi.html
private string[] SplitCsvLine(string line)
{
string pattern = @"
# Match one value in valid CSV string.
(?!\s*$) # Don't match empty last value.
\s* # Strip whitespace before value.
(?: # Group for value alternatives.
'(?[^'\\]*(?:\\[\S\s][^'\\]*)*)' # Either $1: Single quoted string,
| ""(?[^""\\ ]*(?:\\[\S\s][^""\\ ]*)*)"" # or $2: Double quoted string,
| (?[^,'""\ s\\]*(?:\s+[^,'""\ s\\]+)*) # or $3: Non-comma, non-quote stuff.
) # End group of value alternatives.
\s* # Strip whitespace after value.
(?:,|\t|\s|;|$) # Field ends on comma, tab, whitespace or EOS.
";
string[] values = (from Match m in Regex.Matches(line,
pattern,
RegexOptions.ExplicitCapture | RegexOptions.IgnorePatternWhitespace | RegexOptions.Multiline)
select m.Groups[1].Value).ToArray();
return values;
}
// http://answers.unity3d.com/questions/144200/are-there-any-csv-reader-for-unity3d-without-needi.html
private string[] SplitCsvLine(string line)
{
string pattern = @"
# Match one value in valid CSV string.
(?!\s*$) # Don't match empty last value.
\s* # Strip whitespace before value.
(?: # Group for value alternatives.
'(?
| ""(?
| (?
) # End group of value alternatives.
\s* # Strip whitespace after value.
(?:,|\t|\s|;|$) # Field ends on comma, tab, whitespace or EOS.
";
string[] values = (from Match m in Regex.Matches(line,
pattern,
RegexOptions.ExplicitCapture | RegexOptions.IgnorePatternWhitespace | RegexOptions.Multiline)
select m.Groups[1].Value).ToArray();
return values;
}
I’m not going too much into detail here. This becomes very technical. The Regular Expression is being clever (and is well documented in the code), so we leave it at that. It even solves the issue of having an empty last value in our list as well. Not sure if you noticed it in the previous screenshots.
We now replace our Split method with this new method and test again.
if (lineCounter == headersLineNumber) {
headers = this.SplitCsvLine(buf);
//headers = buf.Split(',');
Debug.Log("--> Found header " + headers[0]);
}
if (lineCounter >= valuesFromLine) {
// now we get a , ; or-delimited string with data
// ID ...
values = this.SplitCsvLine(buf);
//values = buf.Split(',');
string ID = values[0];
Debug.Log("--> Found values " + values[0]);
headers = this.SplitCsvLine(buf);
//headers = buf.Split(',');
Debug.Log("--> Found header " + headers[0]);
}
if (lineCounter >= valuesFromLine) {
// now we get a , ; or
//values = buf.Split(',');
string ID = values[0];
Debug.Log("--> Found values " + values[0]);
[...]
And if we run the script now, we also get the Metadata components filled in for our Revit objects:
And if we run the script now, we also get the Metadata components filled in for our Revit objects:

Script 3 - Display parameters
Are we there yet? Not entirely… While our data is now retrieved from the CSV exports and attached at our GameObjects when starting the level, we don’t see anything when playing the game. The user is unaware of this.
So we need to add some additional code which reacts on clicking on objects and then checks if there is metadata attached). However, this also differs between ArchiCAD and Revit exports. With Revit, the metadata-component will be attached on a single object which also carries the geometry and the related Mesh Collider (which we require to be able to react on clicks). With ArchiCAD models, the metadata is attached to an empty Parent object (which does not have geometry nor collider) and all children will have the actual colliders. So there, when we arrive at a Collider, we need to also check its parent.
As this blog post is already way beyond the average attention span of most people these days, we will leave this out. If you are in dire need of a working example, just contact me. That way, I know that somebody read this post till the end!
Comments
Post a Comment